
Dale's Gardner Douglas 427 mk4 Building an AC Cobra re-creation
Wednesday, September 05, 2018
Over 90,000 page views!
Just topped 90k page views, with the US taking the top spot, followed by the UK. Thanks to all visitors to my blog!
Wednesday, August 08, 2018
Northern Cobra Club North York Moors run
It was the Cobra Club Northern annual run this weekend, organised by Mike and Angela Hammond. We decided to just do the Sunday (the run was Saturday and Sunday). The overnight stop and meal was at the White Horse Inn at Rosedale Abbey. Our room was called the Kildale! Sense of humour?
Twelve Cobras had turned out for the run from Rosedale Abbey, ending at the Yorkshire Air Museum at Elvington, near York.
We travelled up on the Saturday evening, only to find that the battery warning light came on and the voltmeter was showing 13 volts (a little low). After some fiddling with the battery cables and Si Smith shorting out the contacts with his wedding ring (ouch - don't try this at home - the ring gets red hot), we decided that it couldn't be fixed, but was probably ok for the run. However, being cautious, we took the decision to head home. The run back was uneventful - so why did we not do the run?
On Tuesday an auto electrician checked out the car and pronounced the alternator faulty (only done 2,150 miles!). So a new one has been ordered and will be delivered and hopefully fitted tomorrow (Thursday).
Today the oil was changed again (a year since its last change), as a precautionary measure. So 5.5 litres of Mobil's best and a new filter put in/on to the engine at 2,275 miles.
Twelve Cobras had turned out for the run from Rosedale Abbey, ending at the Yorkshire Air Museum at Elvington, near York.
 |
| My car in the middle |
 |
| Most of the Cobras |
On Tuesday an auto electrician checked out the car and pronounced the alternator faulty (only done 2,150 miles!). So a new one has been ordered and will be delivered and hopefully fitted tomorrow (Thursday).
Today the oil was changed again (a year since its last change), as a precautionary measure. So 5.5 litres of Mobil's best and a new filter put in/on to the engine at 2,275 miles.
Tuesday, May 08, 2018
Stoneleigh Kit Car Show 2018
Someone counted 85 Cobras on the UK Cobra Club area on Sunday and around 45 on Monday plus over 25 that I saw elsewhere at the show. What a display. Superb!
Thanks to all those who came to say hello on Sunday and Monday - I am not going to name check as I will no doubt miss someone off! It really is a privilege to talk to you all. Comments on my car and blog are really appreciated. It was great to meet all the enthusiasts, both people I know and new Cobra owners embarking upon the build process. Good luck to all and hopefully my blog maybe some small help along the way.
 |
| A view of some of the Cobras on display |
 |
| Another view with my car in the foreground |
 |
| Another shot .... of Cobras |
 |
| My car (again) with the bonnet up |
Monday, March 26, 2018
Heated seats part 3 - wiring
The supplied relays were fixed to the transmission tunnel behind the seats, using self tapping screws over the carpet.
The transmission tunnel carpets were lifted along the edge near the floor. The wires were then fed along this area towards the front of the car and up to the central under dash tray.
The earth wire was attached to the ground point on the chassis.

The supply (live) wire was connected to position 3 on the ignition switch, so that the seats only operated when the ignition was on and would not drain the battery if left switched on.
So now to test. Without the ignition switched on, there were no lights on the switches in any position - so a good start! Next the ignition was turned on. A green light when the switch was set to the low setting. A red light when it was set to maximum. And no light at the off/central point - great news.
Now I just need to test it in anger.
Edit: Been out in the car today (Thursday) and the heated seats really work. Brilliant!
 |
| Relay fixed to the transmission tunnel |
 |
| Wires routed under the carpet, against the transmission tunnel |
 |
| Ground point on chassis |
The supply and ground wires were both extended.
 |
| Wires extended and tie wrapped in place |
20mm holes were drilled in the under dash trays near to the heater outlets. The switch wires were disconnected from the loom and fed through the tray and clicked in to place. They were then reconnected to the looms.

So now to test. Without the ignition switched on, there were no lights on the switches in any position - so a good start! Next the ignition was turned on. A green light when the switch was set to the low setting. A red light when it was set to maximum. And no light at the off/central point - great news.
Now I just need to test it in anger.
Edit: Been out in the car today (Thursday) and the heated seats really work. Brilliant!
Sunday, March 25, 2018
First run out of 2018
Bolted in the seats after fitting the heat pads. Then started her up. Just love the sound of that V8.
To Ilkley, then Bolton Abbey, up to the Strid, over to the outskirts of Skipton, down to Addingham, into Ilkley over the Moors to home. Then topped up with Super Unleaded - the car, not me! Lovely day and great weather.
Good to get out again.
To Ilkley, then Bolton Abbey, up to the Strid, over to the outskirts of Skipton, down to Addingham, into Ilkley over the Moors to home. Then topped up with Super Unleaded - the car, not me! Lovely day and great weather.
Good to get out again.
Friday, March 23, 2018
Burley-in-Wharfedale Classic Car Show - 19 August
See over 350 classic cars at the Burley Classic Show near Ilkley. Last year there were Aston Martins, Rolls Royce, Minis, Jaguars, MGs, Triumphs, Jowetts, Austins, Datsun, Land Rover, American cars and much more. Plus a good selection of motorbikes and some steam engines.
There will be a number of Cobras at the show from the Northern Cobra Club, including mine. So if you fancy seeing them and the car featured in this blog, do come along. It is a great day out.
Put it in your diary - 19 August - and say hello!
There will be a number of Cobras at the show from the Northern Cobra Club, including mine. So if you fancy seeing them and the car featured in this blog, do come along. It is a great day out.
Put it in your diary - 19 August - and say hello!
Saturday, February 24, 2018
Heated seats part 2 - the heaters
The heated seats kit has arrived, along with the staples.
 |
| The kit |
Unfortunately the instructions are in German! But the company who produced them were very quick with a response to an email and a link to an English version. The wiring diagram was fine and understandable, but I was concerned that there was something hidden in the wording.
First the pads were detached from the loom. The pads were fixed to the foam base and back of both seats using the double sided tape fitted to the pads.
This was easy for the base, but I needed to remove more staples from the side (bolster) leather to allow me to get my arm up the back. The latter proved a bit tricky to remove the film from the sticky tape when in place! However, once done and pressed firmly in to place it appears very successful and can't be seen from the outside. Next the leather seat covers were stapled back in place using 8mm staples.
A 16mm hole was drilled in the lower back at the centre and the wires from each pad fed through. An extra layer of tape was wound round the wires, to avoid chaffing, and these were then taped in place facing the transmission tunnel.
A 16mm hole was drilled in the lower back at the centre and the two pad wires were fed through. An extra layer of tape was wound round the wires to reduce the risk of chafing. The wires were made to face the transmission tunnel and taped over. The fixing rails were re-fitted using the original cap head bolts, before the seats were cleaned with leather conditioner. Done.
First the pads were detached from the loom. The pads were fixed to the foam base and back of both seats using the double sided tape fitted to the pads.
 |
| Heat pad in place |
A 16mm hole was drilled in the lower back at the centre and the wires from each pad fed through. An extra layer of tape was wound round the wires, to avoid chaffing, and these were then taped in place facing the transmission tunnel.
 |
| The wires at the base of the backrest |
 |
| Seat looks like it did originally |
Thursday, February 22, 2018
Head restraints - liberating space
The head restraints supplied by GD restricted how far back the seats could be pushed back. So to address this I modified them! Now I have an extra 40-45mm of travel in the seats.
The head restraints were removed from the seats. The head restraint was placed on a flat surface upside down and by putting a metal ruler against it, a line was marked in chalk 150mm up (so 150mm from the top).
Next the sides were marked in chalk. These side lines were marked from the line across the back parallel down to the metal location bars and finished about 12mm behind the bars (you can see how much will be removed).
The leather cover was then removed by releasing the Velcro and then compressing the foam of the head restraint, taking care not to rub off the chalk lines. The measurement/markings were then transferred on to the head restraint leatherette. The three pieces of Velcro were removed from the cover and retained for later use. I turned the cover inside out and then unpicked the sewn seams at both sides from the bottom up to the line that went across the head restraint. There were two rows of stitches (a hidden seam stitch - black in my case and a top stitch - red for mine). The threads were then knotted on the reverse and a covering of contact adhesive applied. These two actions should stop the stitching unravelling further. The leather cover was put to one side.
The surface of the leatherette head restraints were then cut downwards from the line drawn to about 12mm from the head restraint location bars underneath. It was then cut across just above the bottom roll (leaving a lower flap for glueing). This formed an H shape cut (see photo below).
The leatherette was lifted from the foam underneath. The foam that protruded was removed (try a hacksaw to get a smooth surface, but watch you don't cut any leatherette), as was any residual foam still attached to the leatherette of the back, bottom and side flaps. The top flap had about 5mm removed from the across the bottom (the exact amount can be established by pulling the leatherette tight and marking a line across the flap over a flat area of the head restraint, to remove any excess). The side flaps were carefully thinned, then the top flap was thinned for a strip about 12mm deep across the width. The side flap (a triangle) was marked on the reverse of the top flap and this too was thinned.
Contact adhesive was applied to the foam, the reverse of the bottom flap, the reverse of the top flap including the thinned area, the reverse of the thinned side flaps, the leatherette faces of the side flaps, the leatherette face of the lower flap (about 10mm across the width). Once touch dry, the bottom flap, followed by the side flaps were pressed in to place. Finally the larger top flap was pressed in to place on to the foam.
The cover was fitted over the head restraint and the new position of the Velcro marked with chalk. The cover was removed, then the Velcro was glued and machine sewn in place. The stitching was redone by hand, down 45mm below the chalk line - both the seam and the top stitch. The remainder of the seams were simply top stitched for continuity. Finally, after refitting the cover again, it was tightened in place, using the Velcro. The remaining bits at the bottom corners were glued in place to make a neat job.
The modified head restraints have removed a fair bit of the padding at the bottom back which touched the rear bodywork. This now allows the seats to be pushed back a further 40mm or so.
The head restraints were removed from the seats. The head restraint was placed on a flat surface upside down and by putting a metal ruler against it, a line was marked in chalk 150mm up (so 150mm from the top).
 |
| Line in chalk 150mm up |
 |
| Line in chalk across side |
 |
| Leather head restraint cover removed |
 |
| Leatherette cut in H shape on head restraint |
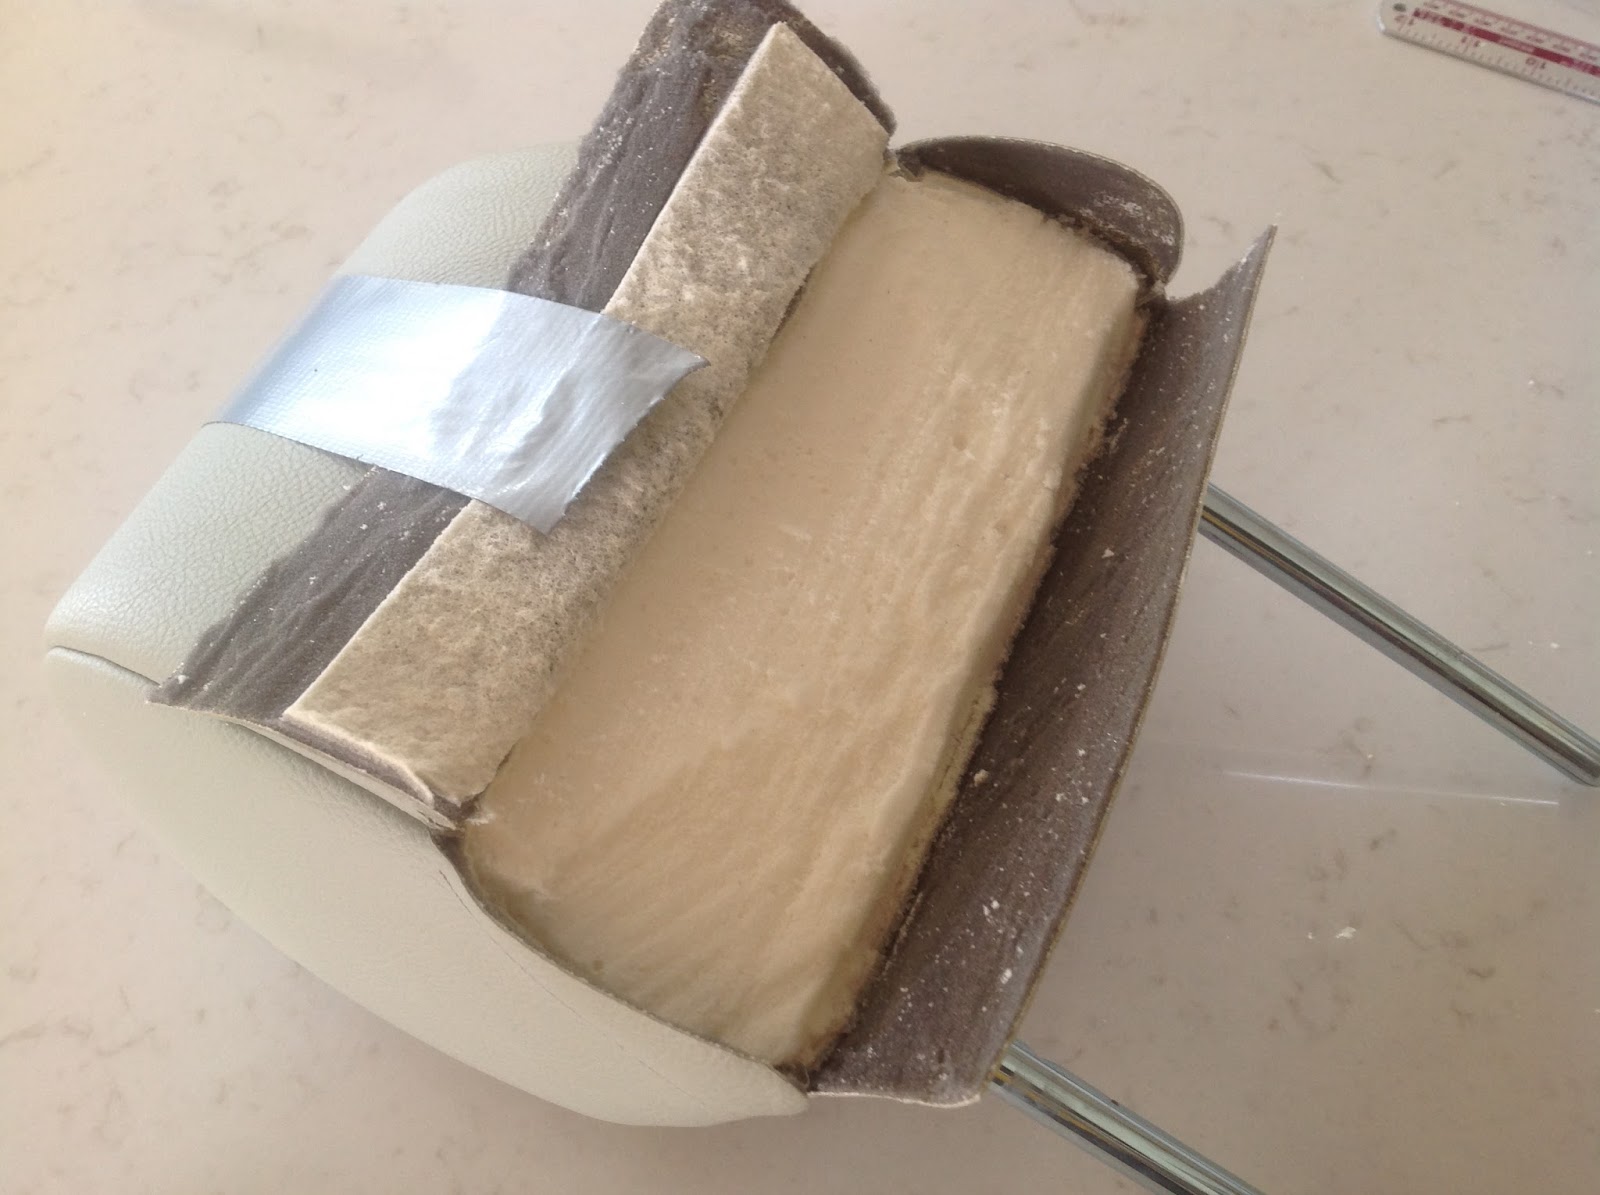 |
| Head restraint being operated on! |
The cover was fitted over the head restraint and the new position of the Velcro marked with chalk. The cover was removed, then the Velcro was glued and machine sewn in place. The stitching was redone by hand, down 45mm below the chalk line - both the seam and the top stitch. The remainder of the seams were simply top stitched for continuity. Finally, after refitting the cover again, it was tightened in place, using the Velcro. The remaining bits at the bottom corners were glued in place to make a neat job.
 |
Head restraint in place liberates about 40mm of extra seat travel,
a further 70-75mm is available if the head restraints are not fitted.
|
Wednesday, February 21, 2018
Heated seats part 1 - preparation
So living in the north where it is cold, I have decided to fit heated seat pads to my Cobra's seats. I had said a while ago that any future cars I had with leather seats would always be heated. But in my infinite wisdom decided not to bother for the Cobra - big mistake!
The heat pads for both seats were ordered from Amazon for just £58, including switches, relays and vat. This compares with a 2015 GD price list (which is all I had) at about £300 inc vat. I have decided to fit the switches to the under dash trays to avoid cluttering the dashboard. They have LED indicators showing that the heaters are off or on and at what setting. I may not be able to see the passenger side warning light from the driver's seat, but I should feel the driver's seat warm! This should remind me to check the passenger side.
First the seats were removed by undoing the four nuts and bolts that held each seat in place.
A seat base was removed from the seat. The base is held in place by Velcro all around and at the front the leather. I lifted the base from the back, pivoting it towards the front. I then found out that the front was also held in place by some glue, so I had to carefully detach it.
I had expected the back rest to be the most difficult, so I explored this first. The leather was secured with staples at the base.
These were removed and to my delight the back leather was not stuck to the foam, so the pad can simply be fed up the back and attached with the sticky tape provided.
Next, the leather was released from around the back of the seat base. This Revealed that the leather was stuck to the foam! So I had to remove the staples from all around the seat base. This was a very time consuming process, because I didn't want to damage the leather. The Velcro was left in place on the base, but staples were removed where necessary.
Once all the staples that located the leather had been removed - loads of them, I tackled the delightful job of separating the leather from the foam. The leather was glued fully on to the top of the foam seat base. Once the leather was released, I scraped off the remnants of foam and lightly sanded this to remove any that I had missed.
To get to this point took me about 3 hours for one seat. Now for the other!
I have also ordered some upholstery staples to help me put it all back together, along with some contact adhesive.
When the pads arrive I will tackle the installation and wiring of them.
The heat pads for both seats were ordered from Amazon for just £58, including switches, relays and vat. This compares with a 2015 GD price list (which is all I had) at about £300 inc vat. I have decided to fit the switches to the under dash trays to avoid cluttering the dashboard. They have LED indicators showing that the heaters are off or on and at what setting. I may not be able to see the passenger side warning light from the driver's seat, but I should feel the driver's seat warm! This should remind me to check the passenger side.
First the seats were removed by undoing the four nuts and bolts that held each seat in place.
 |
| One of the removed seats |
 |
| Velcro and glued area on front of seat base |
 |
| Staples at base of seat back |
Next, the leather was released from around the back of the seat base. This Revealed that the leather was stuck to the foam! So I had to remove the staples from all around the seat base. This was a very time consuming process, because I didn't want to damage the leather. The Velcro was left in place on the base, but staples were removed where necessary.
 |
| Staples removed all around |
 |
| Cleaned up seat base leather (reverse side) |
I have also ordered some upholstery staples to help me put it all back together, along with some contact adhesive.
When the pads arrive I will tackle the installation and wiring of them.
Thursday, February 15, 2018
Stoneleigh National Kit Car Show 2018
The dates for the National Kit Car Show at Stoneleigh in Warwickshire are Sunday 6 May and Monday 7 May. It is the bank holiday weekend.
I will be there, but the weather will dictate if I am in the Cobra or not, as I am still without weather gear for the car! Some of previous displays are below:
 |
| Take a brisk ride in a Westfield to get the adrenalin going! |
 |
| A GD T70 Spyder |
 |
| The GD stand with a mk3 complete with hardtop |
 |
| The Ultima stand |
 |
| A few of the Cobras on display |
 |
A mk3R on the GD stand |
 |
| The AK stand |
Thursday, February 01, 2018
Bonnet handles in place of locks ☹️
I wanted to keep clean lines on the Cobra, so I fitted low profile locks on the bonnet, rather than the traditional locking handles. I felt that my car would look better without the handles and still do. However, from a purely practical point of view, the low profile locks make the bonnet difficult to open. The handles do address this issue.
So I splashed out nearly £120 to address the practicality and thereby sacrificed the looks. I bought a set of handles and locking cams from Europa Spares - a benefit is that the bonnet and boot keys are the same. The four M4 raised head machine screws used to fix the handles came from Kayfast.
The existing locks were removed from the bonnet and the new handles were checked for fit. The existing holes were about 2mm bigger than required and had been squared off for the existing locks, but each hole will be covered completely by the handle fixing plate.
The locating pins on the handle fixing plate were removed, as these and the fixing holes were right next to each other, so would have weakened the fixing point. The underside of the fixing plate were then lightly filed to remove the excess metal left after cutting.
The two fixing holes on each fixing plate were marked next to the existing holes, before drilling 4.5mm holes through the bonnet.
The handles were temporarily fitted to the bonnet.
The cams were fitted so that the top edge was the same distance from the bonnet as the top of the locating slot.
They were then thinned slightly on the bench grinder so that they located in the bulkhead slots. This was a time consuming and faffy job!
Once fitted correctly, the machine screws were secured on the underside with nylon nuts and washers.
The boot handle was a straight swap (apart from shortening the square bar) and it looks exactly the same.
So I splashed out nearly £120 to address the practicality and thereby sacrificed the looks. I bought a set of handles and locking cams from Europa Spares - a benefit is that the bonnet and boot keys are the same. The four M4 raised head machine screws used to fix the handles came from Kayfast.
The existing locks were removed from the bonnet and the new handles were checked for fit. The existing holes were about 2mm bigger than required and had been squared off for the existing locks, but each hole will be covered completely by the handle fixing plate.
 |
| Locating pins removed from inner side of each hole on each fixing plate |
 |
| Two 4.5mm holes drilled each side of existing hole |
 |
| Raised head machine screws used to secure fixing plate |
The cams were fitted so that the top edge was the same distance from the bonnet as the top of the locating slot.
 |
| Locating slot with escutcheon around it |
 |
| Curved surface of cam thinned down |
 |
| Bonnet handles fitted in place of locks (a shame) |
The boot handle was a straight swap (apart from shortening the square bar) and it looks exactly the same.
Tuesday, January 23, 2018
Hardtop for Cobra
After trying to buy a hood from GD for some 18 months, they have now announced a hardtop. The Le Mans hardtop, is close to the original Cobra style.
At the time of posting this blog the soft top was still not available. I had a number of other options, to get a hood and I was getting very close to doing this. But I really liked the shape of the Le Mans hardtop, even if you do have to open the rear window in order to open the boot.
427hardtops produce one that looked particularly good. This is a stunning creation, has a window behind the door and stainless steel around the side screens. It may not look like a traditional Cobra hardtop, but still looks very attractive. The design was originally for a Dax Cobra, so it is not an exact fit on the GD. However, 427hardtops have done one for a GD and have another scheduled for February this year. The hardtop comes virtually finished, although it has to be sprayed after that. April looks to be the earliest they could do one for me.
The GD hardtop by comparison is slightly less expensive and looks more like the original. It does however come in kit form, although it can be factory fitted at an extra cost. It is also self coloured, so it should match the gelcoat of the car thereby avoiding the need to have it sprayed.
The GD option is slightly shorter than the 427hardtops version. The benefit here is that my fuel filler is at the corner of the boot, rather than an Aston style filler on the rear wing, so it should be easier to access inside the hardtop to fill up. If necessary the fuel filler will be mounted on the C pillar, but this will make the hardtop virtually permanent. I have been quoted 2 months (although 4 months is what it works out at in reality!).
|
Monday, January 22, 2018
Wind deflector part 2
After creating the template (see last post), I applied masking tape to the polycarbonate where it would be cut. Then I marked the shape of the template on to the masking tape, including the eye bolt hole centres. A soft cloth was put on the bench to avoid any scratches when cutting. The deflector was cut to the shape of the template using an electric jig saw (use the correct blade and a very slow speed to avoid melting the material - I used speed 2 out of 5). The part cut from the bottom was supported by tape to avoid it snapping when the cut was near to the end.
Next the four holes for the seat belt anchorages (eye bolts) were drilled. A 4mm hole was drilled first as a pilot hole with a sharp HSS bit. After checking that the pilot holes were in the right place, these were then drilled to size, using a 22mm hole saw.
The edges of the polycarbonate were shaped with a file. Then they were finished off with P80, P400 and P1000 wet n dry paper. Finally the edges were buffed with a foam pad and G10 polishing compound, using the polishing machine. The edges now look like glass.
 |
| Polycarbonate cut to shape |
The edges of the polycarbonate were shaped with a file. Then they were finished off with P80, P400 and P1000 wet n dry paper. Finally the edges were buffed with a foam pad and G10 polishing compound, using the polishing machine. The edges now look like glass.
 |
| The fixings, but note that the screws used were 30 mm long |
Next the deflector was temporarily fitted on to the roll hoops using just the seat belt eye bolts. The six fixing holes (to locate the P-clips) were marked on to masking tape.
A soft cloth was placed on the bench again to protect the polycarbonate and then the holes were drilled out gradually to 6 mm. It is advisable to drill in to a block of wood to stop the polycarbonate cracking. The deflector was then temporally attached to the roll hoops again, with the P-clips and using M6 x 30 mm button head screws with nylon nuts to make sure they were in the correct position.
Once I was happy with the fit and finish, I removed the protective film from either side of the polycarbonate. Then I wiped the dust from the polycarbonate with a soft cloth.
The deflector was then fixed in its final place. The metal washers go under each screw head and against the outside of the P-clip, with nyloc nuts to stop the deflector working lose (make sure that the plastic washers are against the polycarbonate to reduce the likelihood of cracking). Finally the eye bolts were refitted, along with the seat belts.
 |
| Finished wind deflector in place |
Does it work? Well it doesn't stand out or detract from the Cobra's lines. It does cut down on the wind behind you head significantly, but it does not totally eliminate it. To do that a hood, a hardtop or a tin top would really solve the problem.
Monday, January 01, 2018
Wind deflector part 1
Yes, I am a wuss! Its official. The back draught of cold air and buffeting in the Cobra at this time of year especially (when it is cold) needs taming. I do have a beany hat and a scarf to help keep out the worst of the cold. But most importantly, my wife prefers her hair the right way round!
I researched the subject on the Internet, the Cobra Club Forum and read an article by Paul Hutton (which is really good) in the April 2017 publication of the Snake Torque magazine. From this research I reckoned that there was a way of cutting down the draught on my neck and my passenger's without detracting from the Cobra's lines. So here is what I have done.
Template
First the four seat belt eye bolt anchorages were unscrewed from the roll hoops. The wind deflector will fit behind the seats and onto the face of the hoops. Masking tape was applied to the body on the cabin side of the roll hoops to prevent any marks.
The template was made of hardboard. Duct tape was used to hold the hardboard in place each time it was removed and refitted.
First, the hardboard was marked up to follow the body of the car, then cut with a jig saw. After the first cut, it took a bit of messing about to get the right gap all the way across at the bottom.
Once I had this sorted I marked up the top and sides. The deflector extends 50mm beyond each roll hoop towards the outside of the car. If the deflector extends any further it will scoop up the air passing down the side of the car and channel it behind your head, defeating the whole thing!
Then I marked up a slope - from the top middle of each roll hoop to the outside (about 75mm down from the top), before marking rounded corners. The top corners were a 75mm radius and the bottom corners a 25mm radius (hope this will be ok for the hood or hardtop I get). The template was then cut with a jig saw and planed to get smooth edges. Next I marked the eye bolt holes using a hammer against the hardboard and the mounting hole. The centre was then marked and drilled using a 6mm bit. After checking the holes were in the right place, I drilled them out to 22mm using a step drill. The hole needs to be big enough to clear the shoulder of the eye bolt.
Finally I put the eye bolts in place finger tight to check they were clear of the hole sides.
I have allowed a 5mm gap between the deflector and the body. This will allow the pressure inside the cabin to be equalised.
Material
Laminated glass - this option was beyond my capabilities to work with. It would need to be laminated to avoid it shattering if hit by a stone. Glass is expensive, not easy to cut or drill and is also quite heavy. So this was ruled out.
Perspex - easy to cut and drill. Cheap to buy and widely available. Loses transparency over time, can warp when exposed to UV light and can break in to large shards if hit by a stone. So this too was not an option for an open sports car with no top.
Acrylic sheet - easy to cut and drill. Stable dimensionally, to UV light and stays clear. It has greater break resistance than glass. On impact it breaks in to relatively large pieces, rather than small pieces or shards. Withstands large changes in temperature. Lightweight. Better transparency than glass. Expensive and harder to source.
Solid polycarbonate - similar properties and strength to acrylic sheet. Easier to source and less expensive than Acrylic.
So polycarbonate it was. I have ordered 8mm thick which by all accounts is about right. Any thinner and I risked it vibrating or flexing at speed. Any thicker and it is over doing things. The size of the polycarbonate sheet ordered is 1220mm x 360mm. Prices seem to vary quite alot over time (oil prices?), but Century Plastics in Sheffield seemed to have the best price at around £30 including VAT and carriage and their service is great.
My next post will be cutting, drilling and fitting the deflector.
I researched the subject on the Internet, the Cobra Club Forum and read an article by Paul Hutton (which is really good) in the April 2017 publication of the Snake Torque magazine. From this research I reckoned that there was a way of cutting down the draught on my neck and my passenger's without detracting from the Cobra's lines. So here is what I have done.
Template
First the four seat belt eye bolt anchorages were unscrewed from the roll hoops. The wind deflector will fit behind the seats and onto the face of the hoops. Masking tape was applied to the body on the cabin side of the roll hoops to prevent any marks.
 |
| Eye bolts removed and masking tape applied |
 |
| Duct tape on back to hold template |
 |
| Hardboard with first line drawn |
Then I marked up a slope - from the top middle of each roll hoop to the outside (about 75mm down from the top), before marking rounded corners. The top corners were a 75mm radius and the bottom corners a 25mm radius (hope this will be ok for the hood or hardtop I get). The template was then cut with a jig saw and planed to get smooth edges. Next I marked the eye bolt holes using a hammer against the hardboard and the mounting hole. The centre was then marked and drilled using a 6mm bit. After checking the holes were in the right place, I drilled them out to 22mm using a step drill. The hole needs to be big enough to clear the shoulder of the eye bolt.
 |
| Template cut and eye bolt holes drilled |
 |
| Final template with eye bolts in place |
Material
Laminated glass - this option was beyond my capabilities to work with. It would need to be laminated to avoid it shattering if hit by a stone. Glass is expensive, not easy to cut or drill and is also quite heavy. So this was ruled out.
Perspex - easy to cut and drill. Cheap to buy and widely available. Loses transparency over time, can warp when exposed to UV light and can break in to large shards if hit by a stone. So this too was not an option for an open sports car with no top.
Acrylic sheet - easy to cut and drill. Stable dimensionally, to UV light and stays clear. It has greater break resistance than glass. On impact it breaks in to relatively large pieces, rather than small pieces or shards. Withstands large changes in temperature. Lightweight. Better transparency than glass. Expensive and harder to source.
Solid polycarbonate - similar properties and strength to acrylic sheet. Easier to source and less expensive than Acrylic.
So polycarbonate it was. I have ordered 8mm thick which by all accounts is about right. Any thinner and I risked it vibrating or flexing at speed. Any thicker and it is over doing things. The size of the polycarbonate sheet ordered is 1220mm x 360mm. Prices seem to vary quite alot over time (oil prices?), but Century Plastics in Sheffield seemed to have the best price at around £30 including VAT and carriage and their service is great.
My next post will be cutting, drilling and fitting the deflector.
Subscribe to:
Posts (Atom)